Code Signing with Azure Key Vault: Generate CSR and Setup Code Signing Certificate

Prerequisites
Before starting, ensure you have the following:
- Azure Subscription: In order to use Azure, an active Azure subscription is required.
- Azure Key Vault: Sign in to the Azure portal and initiate a Key Vault.
- Azure CLI: Use Azure Command-Line Interface (CLI) as a tool that allows you to work with resources in the terminal.
Buy Code Signing Certificate and Prove Software Authenticity Starts at $215.99/Yr
Steps to Configure Code Signing with Azure Key Vault
Below are the procedures for safely storing a code signing certificate and private key in Azure Key Vault. This method is standard for cryptographic protocols and does not require a USB token or your HSM.
Step 1: Set Up Azure Key Vault
1. Create an Azure Key Vault
- Open your browser, navigate to the Azure portal, http://portal.azure.com, and sign in with your credentials.
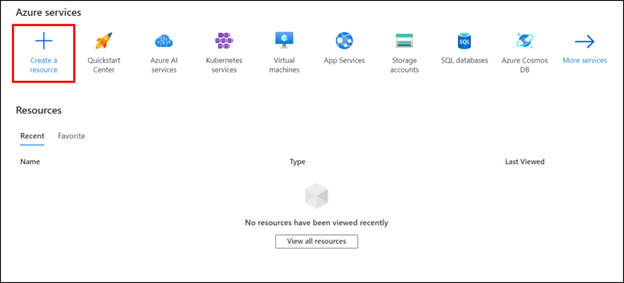
- Select the “Create a resource” button.
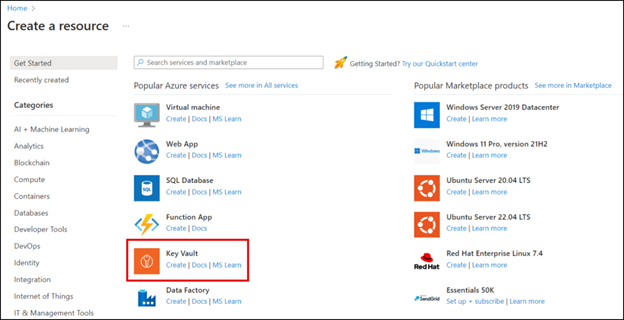
- Navigate down to Key Vault from the list and select “Create”.
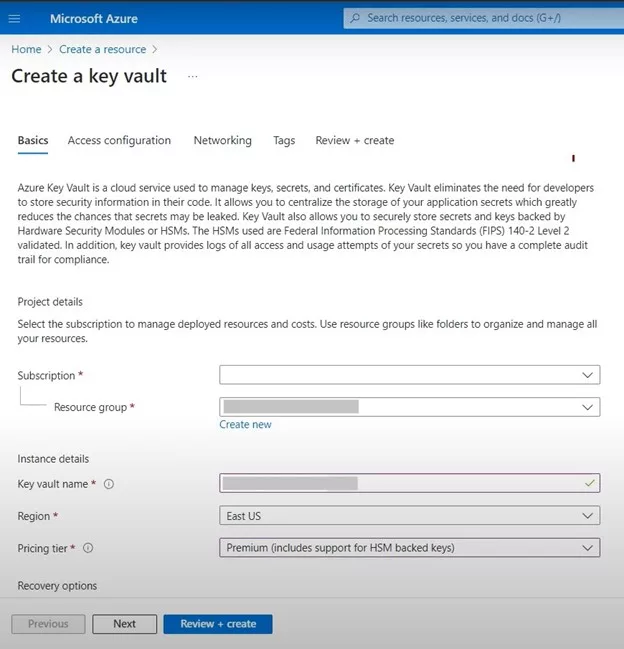
- Under the Basics tab, choose your subscription and resource group. If required, they can create the new resource group by going through the option “Create new”.
- Name your Key Vault and select the region you want it to be located in.
- To adhere to the FIPS 140-2 standards, choose the “Premium” pricing category.
- Set up options that control the behavior of a recovery process, such as purge protection and the deleted vault age.
- On the final page of configuring the access settings, click the Next button to move to the Access Configuration Settings page.
- Select “Access Configuration” to specify the required access rules for the corresponding Key Vault.
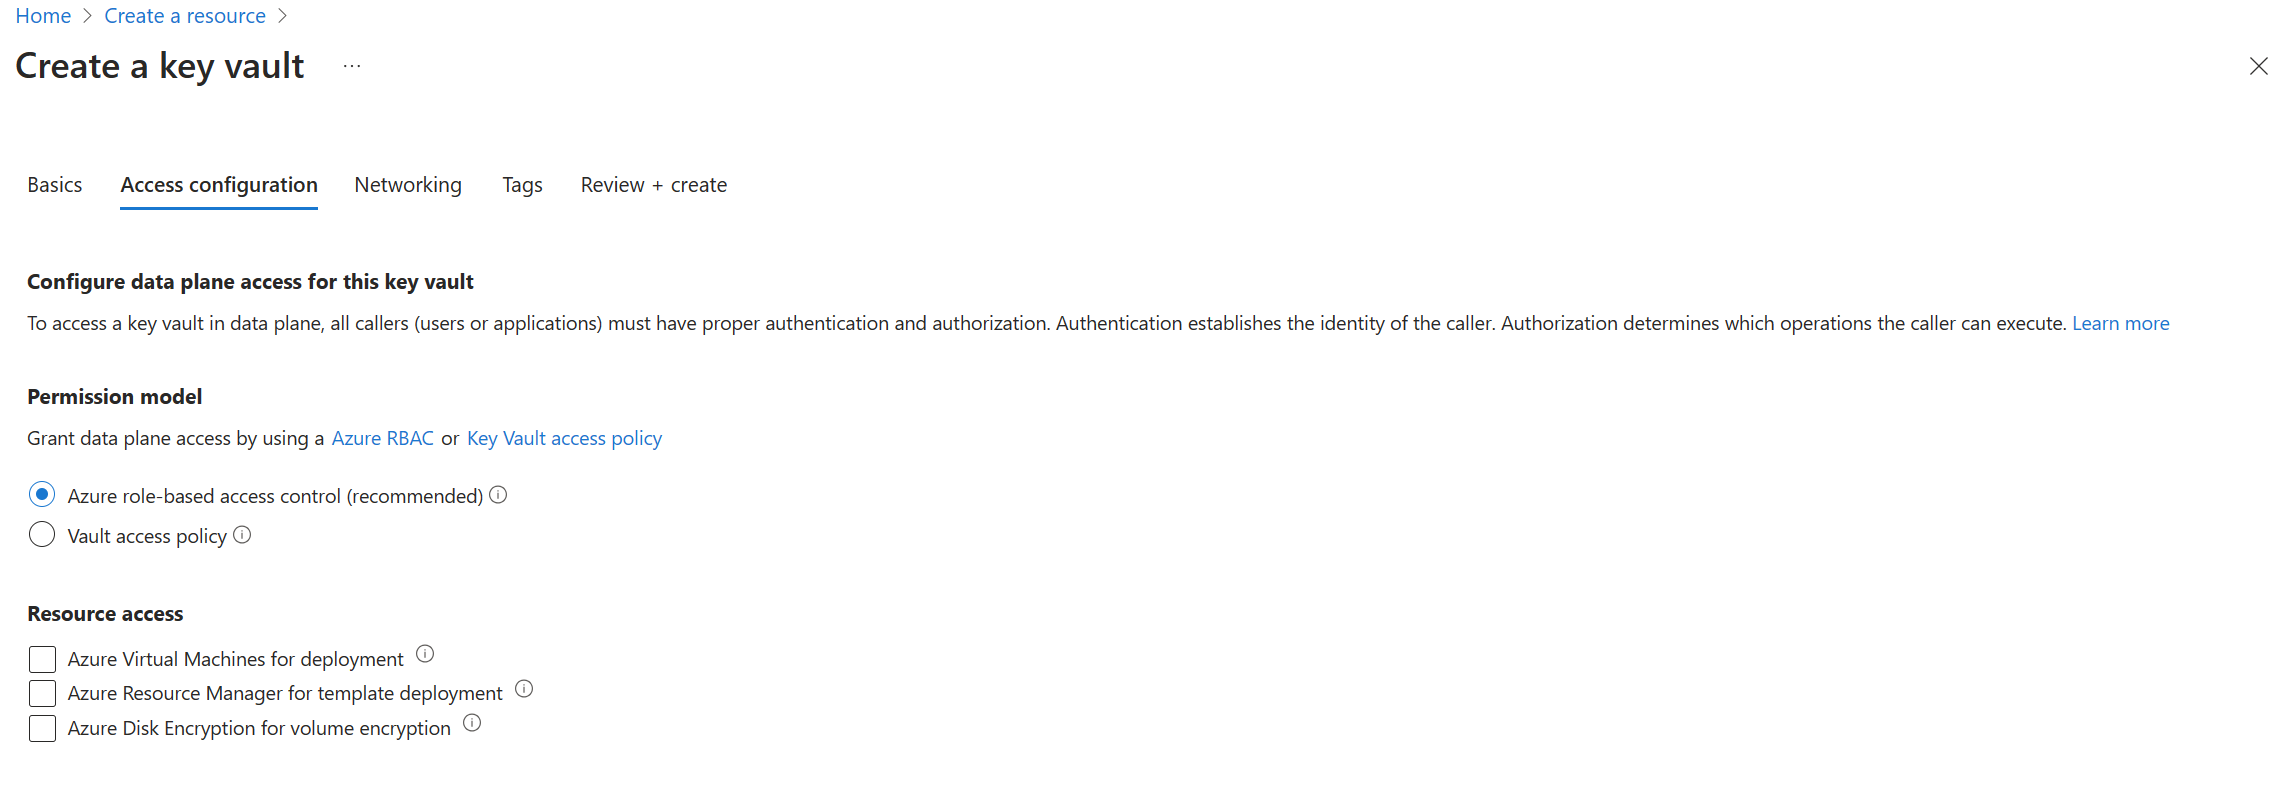
- Press the “Networking” button to select a connection type.
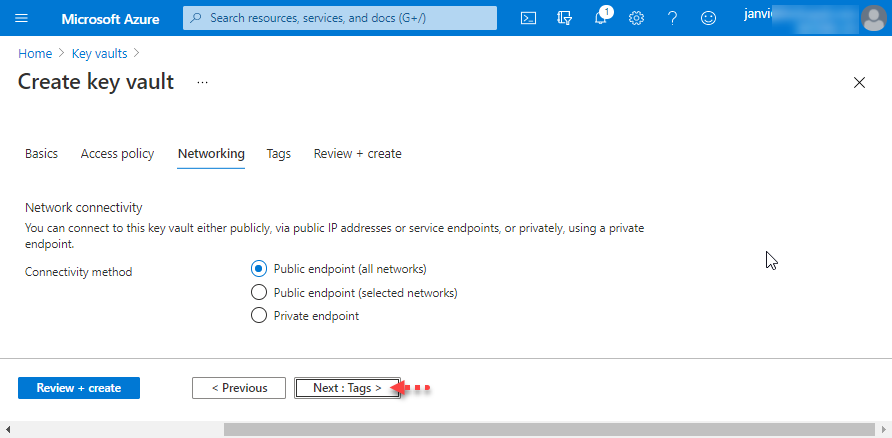
- To do this, use the “Tags” feature if you want to create tags for this Key Vault.

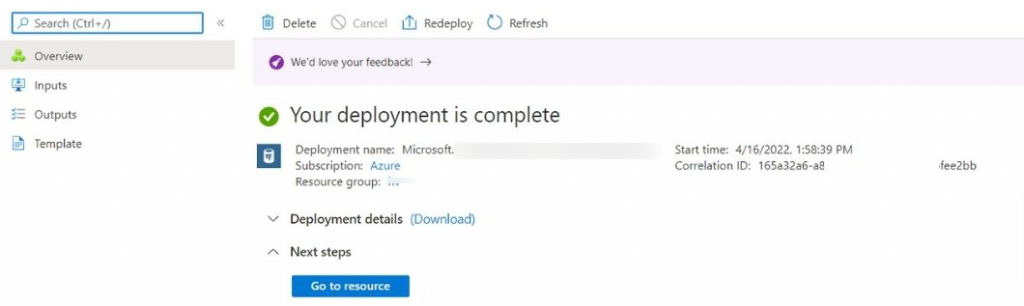
- Proceed with “Review + create”, review your settings, and finally, click “Create” to create a new Key Vault.
- This will create your new Key Vault in Azure. Once prepared, utilize the “Go to resource” button to load it for use.
2. Assign Permissions
Check if your application or user account is granted the appropriate privileges to work with the Key Vault and sign messages.
- In the Azure portal, Go to your Key Vault.
- In the “Access policies” section, find “Add Access Policy”.
- Permission for “sign” and “get” should be granted.
- With Azure CLI, you can use the command:
az keyvault set-policy --name YourKeyVaultName --upn [email protected]
--key-permissions sign get
3. Purchase a Code Signing Certificate
It is important for the user to know that only DigiCert code signing certificates OV or EV work with Azure Key Vault. Sectigo/Comodo certificates require key attestation which we know is not supported by Azure Key Vault.
Step 2: Create & Merge Certificate Signing Request (CSR)
1. Create CSR
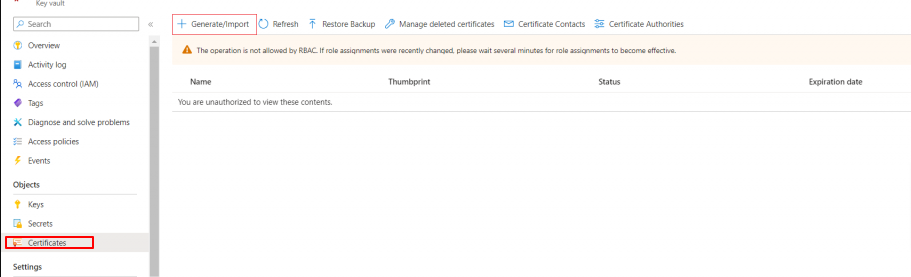
- Select your key vault and click “Certificates“.
- Click “Generate/Import” to open the Create a certificate window.
- Fill in the required fields:
- Method of Certificate Creation: Select “Generate.”
- Certificate Name: Enter a unique name.
- Type of Certificate Authority (CA): Choose “Certificate issued by a non-integrated CA.”
- Subject: Provide the X.509 Distinguished Name.
- Validity Period: Leave it as the default 12 months (for code signing certificates with longer validity periods, the issued certificate will match your order).
- Content Type: Select “PEM”
- Lifetime Action Type: Configure email alerts based on a certain percentage of the certificate’s lifetime or a specific number of days before expiration.
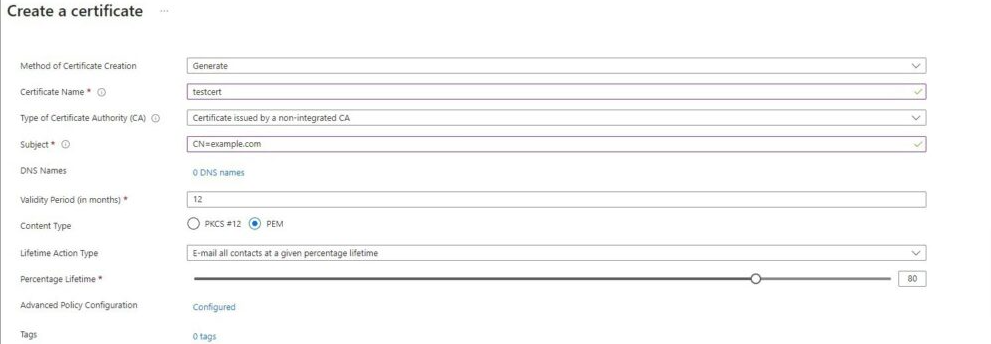
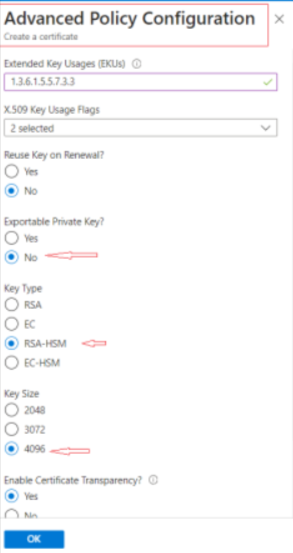
- Click “Advanced Policy Configuration” to set the key size (3072 or 4096 for code signing), type (RSA+HSM), and policies for key reuse and exportability (select “No” for both).
- Click “OK” and then “Create“.
- Locate your certificate in the list of in-progress, failed, or canceled certificates, click it.
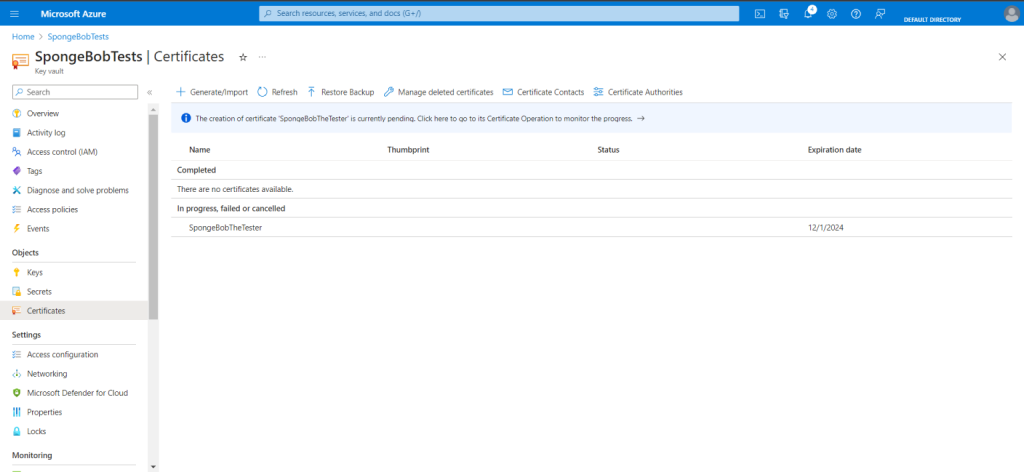
- click “Certificate Operation” followed by “Download CSR“.
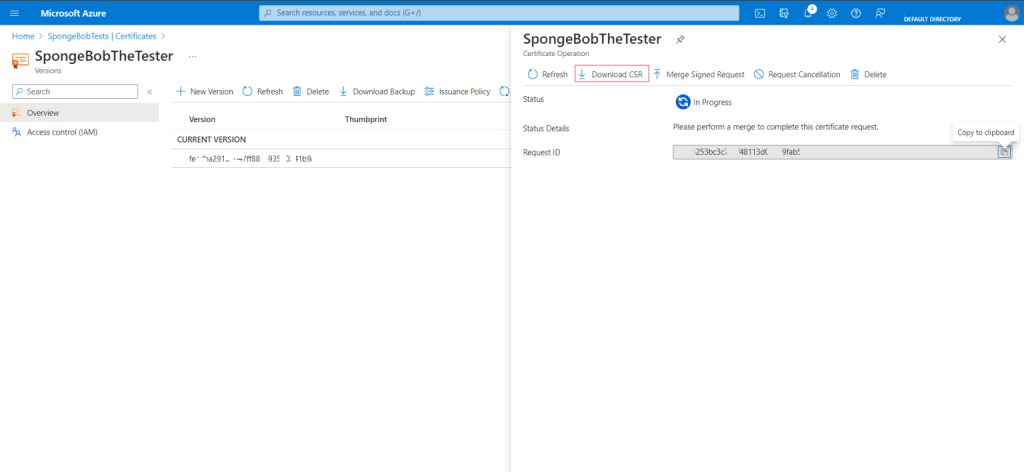
- Save the file in a secure location.
2. Submit CSR & Complete Validation
- Contact our support team to submit the CSR. We’ll take care the rest.
- DigiCert will send a verification email as part of the validation process. Fill out the required forms to confirm compliant key storage, then wait for the certificate to be issued.
3. Merge Certificate
- After DigiCert issues your certificate, go back to Azure Key Vault, open the certificate, click “Certificate Operation“, and then “Merge Signed Request.”
- Open the .zip file sent by DigiCert, locate the certificate file, open it in a text editor, copy the certificate text, paste it into Azure Key Vault, and complete the merge.
Step 3: Sign Code Using Azure Key Vault
1. Install AzureSignTool
AzureSignTool is an open-source version of SignTool modified to work with Azure Key Vault. Download and install it:
dotnet tool install --global AzureSignTool2. Setup an Azure Entra ID Application
Register an application in Azure Entra ID (formerly Azure AD):
- Follow the instructions at Microsoft Docs.
- Note your Tenant ID and Application (client ID).
- In the app’s navigation menu, go to “Certificates & Secrets“, then “Client Secrets.” Click “New Client Secret“, create a new secret, and immediately copy the displayed “Value“.
3. Grant the Application Access to the Key Vault
- Open your Key Vault and go to “Access control (IAM)“.
- Click “Add role assignment“, choose a role with sufficient permissions (e.g., Key Vault Crypto User), and grant access to your Entra ID application.
4. Sign Your Executable
- Use the AzureSignTool to sign your executable:
azuresigntool sign -kvu [vault uri] -kvc [certificate name] -kvi [application id] -kvs [secret] -kvt [tenant id] -tr http://timestamp.digicert.com -v [filename.exe]- Replace the placeholders (including brackets) with your actual values:
- kvu: Your Key Vault’s Vault URI
- kvc: Your certificate’s name in Key Vault
- kvi: The Entra application ID
- kvs: The Entra application secret
- kvt: Your Entra ID tenant ID
- tr: Timestamp URL (e.g., http://timestamp.digicert.com)
Step 4: Verify the Digital Signature
Verify the signature of your signed executable using tools like signtool or by checking the properties of the file in Windows Explorer.
Conclusion
CheapSSLWeb is the trusted and well-known SSL/TLS, Email, and Code Signing certificate provider of Reputed Certificate Authorities at affordable rates.
