Installing an SSL Certificate on Plesk Onyx
Get an SSL Certificate on Plesk Onyx: Complete Installation Guide
Upon activating an SSL Certificate and fulfilling validation requirements, the SSL certificate undergoes issuance and is subsequently dispatched to the designated administrative contact email address.
In the forthcoming discussion, we will investigate installing an SSL Certificate on Plesk Onyx. Furthermore, valuable insights will be provided on selecting the optimal source for acquiring the finest SSL Certificate tailored for Plesk integration.
Enabling a Secure HTTPS Connection
Ensuring a secure online experience is paramount, and enabling HTTPS connection is pivotal. Depending on your Plesk account type, the following instructions guide you seamlessly through the process.
- Service Provider View (Server Administrator and Reseller Accounts)
- Navigate to the Domains section.

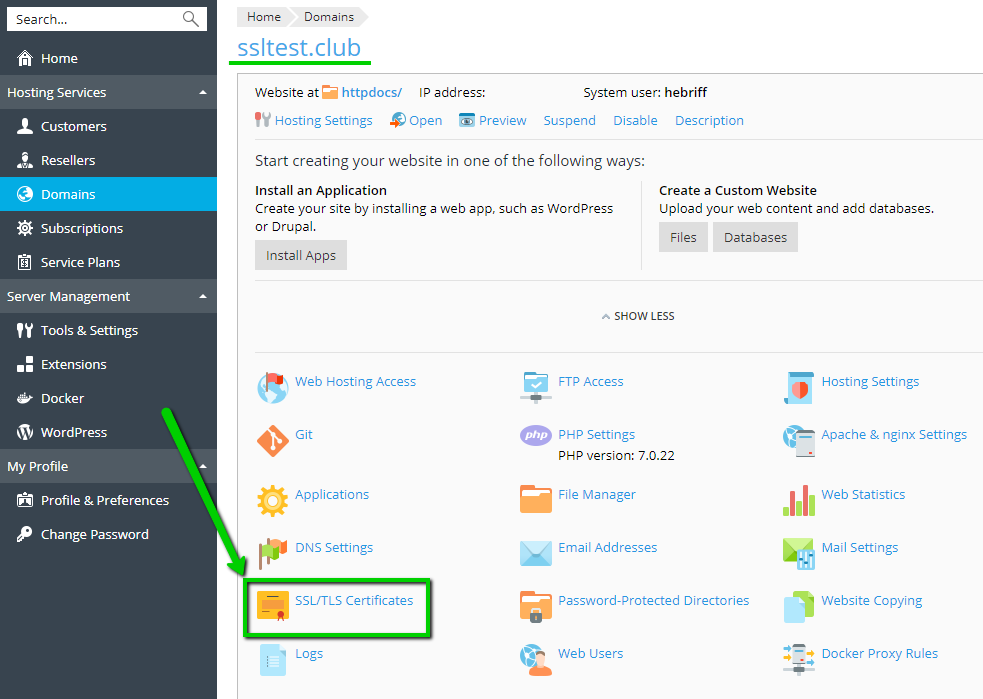
- Click on the domain name you intend to secure.
- Power User View (Customer Account)
- Head to Websites & Domains.
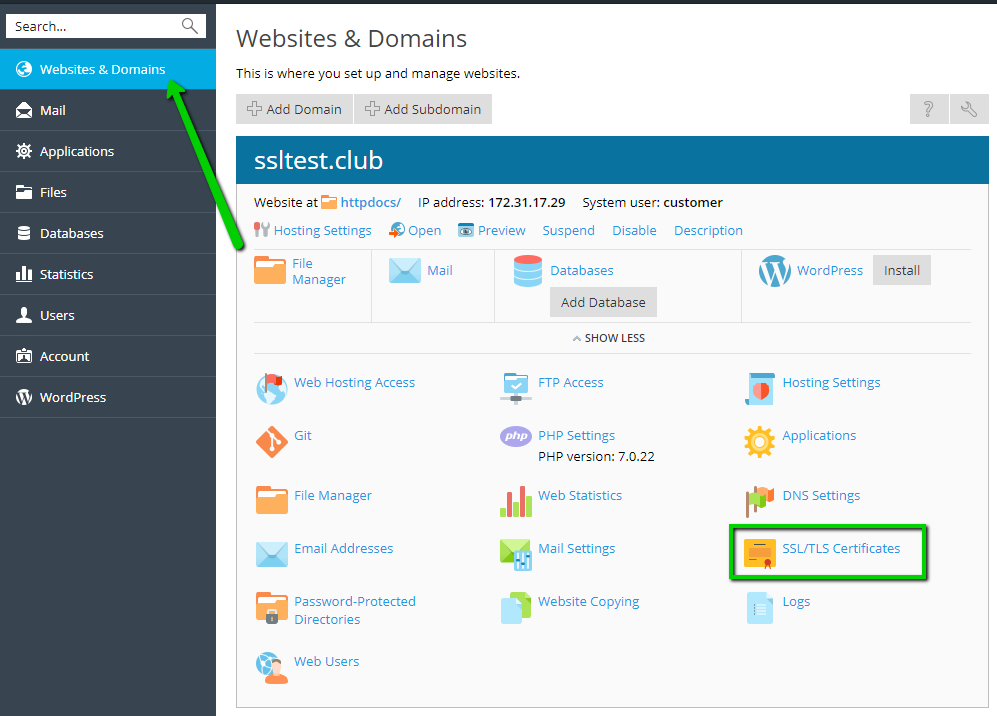
- Locate the relevant domain and click on it.
- Access SSL/TLS Certificates
Regardless of your account view, the next step is identical. Click on SSL/TLS Certificates.
- Select Your SSL Certificate
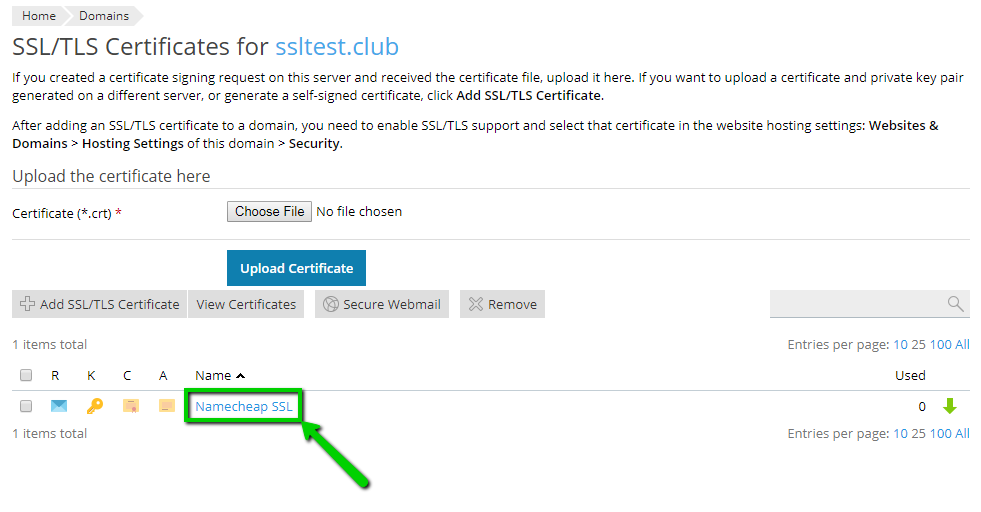
- Locate the title of your SSL certificate for which you generated the CSR code.
- Click on it to proceed.
- The faded C (certificate) and A (CA certificate) icons indicate pending uploads of the SSL certificate file and CA bundle.
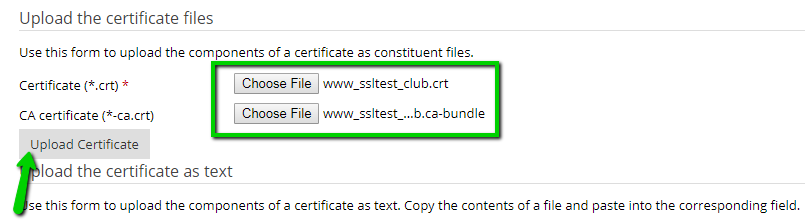
- Upload Certificate Files
On the subsequent page, you can upload both the SSL certificate file (.crt) and the CA certificate (.ca-bundle), both of which can be downloaded easily.
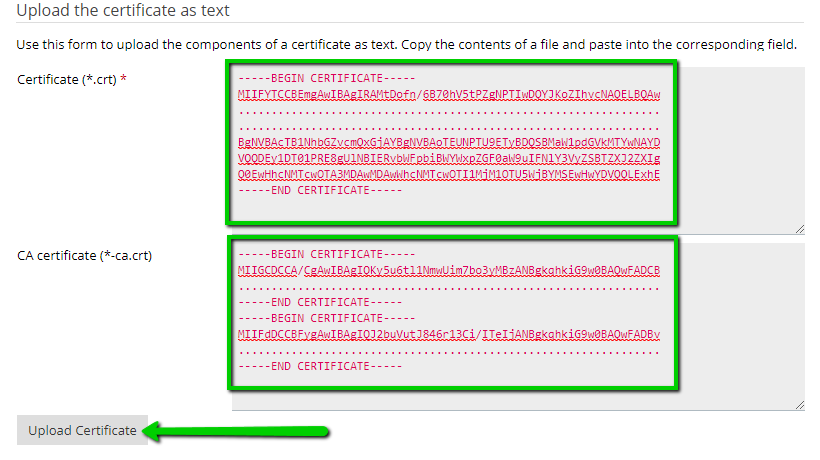
- Alternatively, Upload in Text Format
If preferred, upload the SSL certificate and CA certificate in text format. Ensure no extraneous spaces exist in the CA certificate code.
- Confirm Successful Upload
- Once uploaded, a success message will confirm the action.
- The icons representing the certificate (C) and certificate authority (A) will brighten, indicating successful uploads.

- Assign SSL Certificate
Proceed to assign the SSL certificate to your hosting services.
- Select Your Certificate
- Locate your SSL certificate from the drop-down list.
- Confirm your selection by clicking OK.

- Completion and Success
The installation is acknowledged with a success message.

By following these straightforward steps, you’ll effortlessly enable an HTTPS connection, bolstering your website’s security and ensuring a safer browsing experience for your users.
Securing Plesk Login Page and Mail Services
Enhancing the security of your Plesk login page and mail services (SMTP, IMAP, POP3) is crucial in safeguarding sensitive data. Below is a detailed walkthrough to seamlessly achieve this.
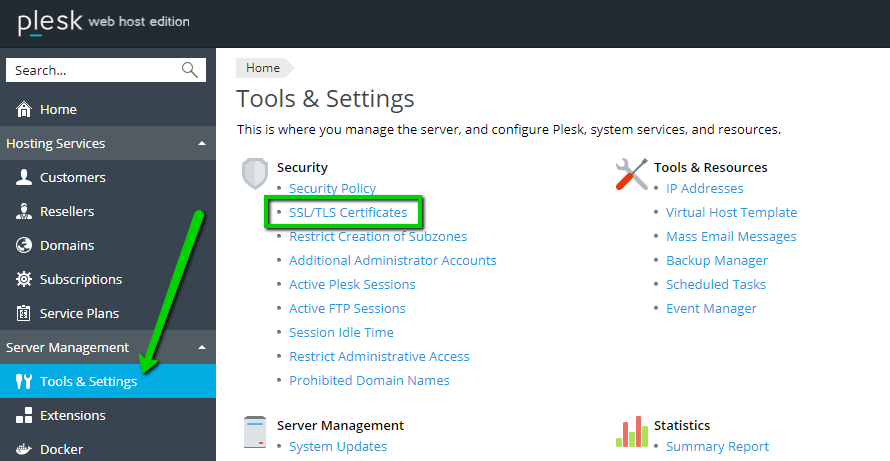
Step 1: Access SSL/TLS Certificates
- Log in as Administrator or an account with administrator privileges.
- Navigate to Tools and Settings and select SSL/TLS Certificates.
Step 2: Choose Secure Options
In the SSL/TLS certificates section, you’ll encounter two choices:
- “Securing Plesk (login page).”
- “Securing mail”
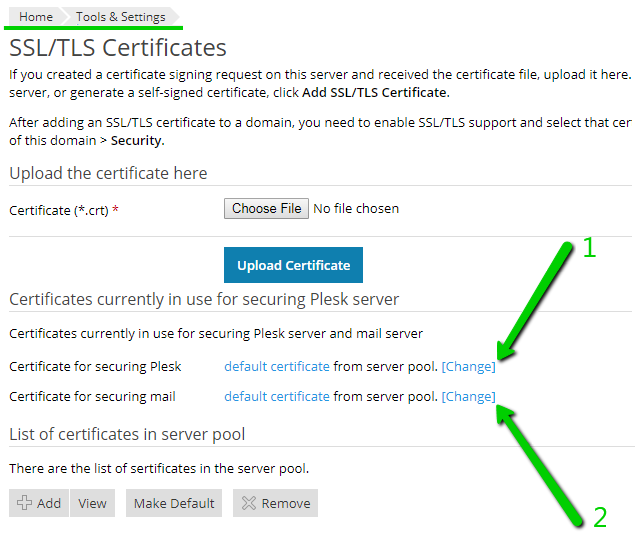
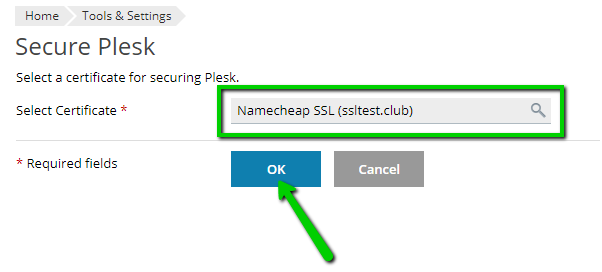
Step 3: Select the Correct SSL Certificate
- Opt for the appropriate SSL certificate that aligns with your security requirements.
- Confirm your selection by clicking “OK.”
Step 4: Successful Installation Confirmation
A successful installation will be indicated by a confirmation message.

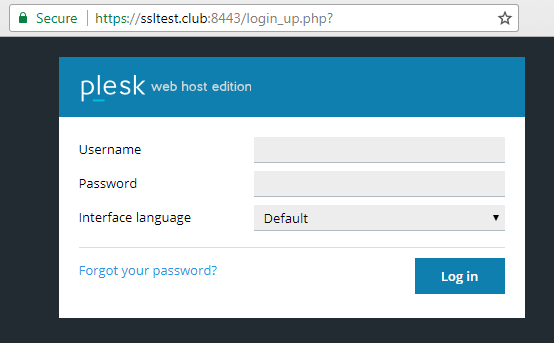
Step 5: Check Plesk Login Page
Verify the secured login page by entering your domain name and port 8443 (e.g., https://yourdomain.com:8443).
Securing Mail Services (SMTP, POP3, IMAP) with SSL Certificate
Steps 1-2: Repeat steps 1-2 from the previous part to secure mail services.
Step 3-4: Follow the SSL installation process outlined in steps 3-4 of the previous section for installing SSL for Mail Services.
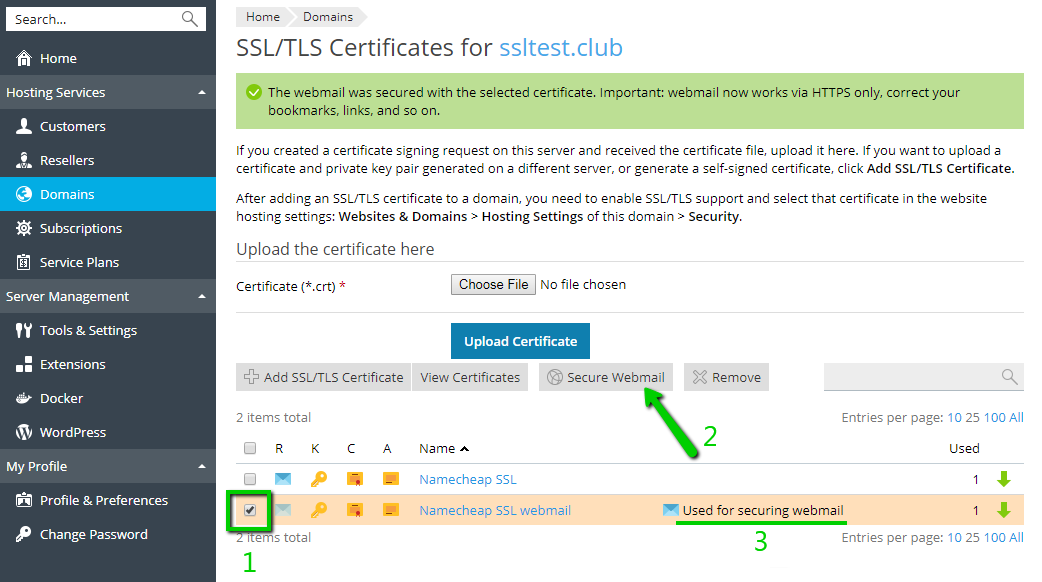
How to Secure your Webmail Interface?
Step 1: Access SSL/TLS Certificates
- For Service Provider view: Head to the “Domains” section, and select your domain (steps 1-2 from the first part).
- For Websites & Domains view: Choose your domain (step 3 from the first part) and proceed to “SSL/TLS Certificates.”
Step 2: Secure Webmail
- Pick the suitable SSL certificate and click on “Secure Webmail.”
- Verify the successful notification.
Step 3: Check Webmail Service
To ensure secure webmail access, use the webmail subdomain in this format: https://webmail.example.com.
You can fortify your Plesk login page, mail services, and webmail interface, guaranteeing the utmost protection for sensitive communications and data.
Creating a Certificate Signing Request (CSR) in Plesk
Generating a CSR is a crucial step in securing your website with SSL. The CSR is essential for SSL verification and validation. To generate a CSR, you have two options;
Option 1: Use a CSR Generator for Automated Creation
An efficient way to generate a CSR is by using a CSR Generator, which automates the process.
Option 2: Follow a Step-by-Step Tutorial
If you prefer a manual approach, follow these steps:
- Log in to Your Plesk Dashboard
Access your Plesk dashboard using your credentials.
- Choose the Domain
In the left pane, locate and select “Domains” (Plesk Onyx) or “Website and Domains” (Plesk 12). Identify the domain you want to secure.
- Access SSL/TLS Certificates
Navigate to the central menu and click on “SSL/TLS Certificates” (Plesk Onyx) or “Secure Your Sites” (Plesk 12).
- Add SSL/TLS Certificate
On the new page, click “Add SSL/TLS Certificate.”
- Provide Certificate Details
Enter the necessary parameters for your SSL certificate as per below:
- Certificate Name: Assign a recognizable name for the certificate.
- Bits: Select the encryption level (recommended: 2048).
- Country: Choose your company’s country of origin from the drop-down list.
- State or Province: Input the full state name where your business is legally located.
- Location (City): Specify the city where your organization is registered.
- Organization Name (Company): Use the legal company name for Business Validation or Extended Validation Certificates. For Domain Validation (DV), use your full name or website name.
- Organization Department or Division Name: If unsure, use “IT” or “Web Administration.” For DV certificates, enter “NA.”
- Domain Name: Provide your website’s Fully Qualified Domain Name (FQDN). Include an asterisk at the beginning for Wildcard certificates.
- Email: Supply a valid email address for domain ownership verification.
- Verify and Submit
Review the provided information and click “Request” to proceed. Plesk will generate the CSR code and private key.
- Access Codes
To view the generated codes, locate your certificate name from the list of certificates. Click on the certificate name to access both codes.
- Copy the CSR Code
Copy the CSR code, including the “—–BEGIN CERTIFICATE REQUEST—–” and “—–END CERTIFICATE REQUEST—–” tags. This code will be required during the SSL order process.
By following these steps, you’ll successfully generate a CSR in Plesk and be ready to secure your website with SSL encryption.
Step-by-Step Guide: Installing an SSL Certificate on Plesk Onyx
To enhance the security of your website, installing an SSL Certificate on Plesk Onyx is essential. Here’s a comprehensive walkthrough to guide you through the process;
- Log into Your Plesk Account
Begin by accessing your Plesk account using your credentials.
- Choose Domain and Access SSL/TLS Certificates
Depending on your user role, follow these steps:
- For Server Administrators and Resellers:
Navigate to the “Domains” section, select the desired domain, and click “SSL/TLS Certificates.”
- For Default Customer Accounts:
Head to “Websites and Domains,” choose the relevant domain, and access “SSL/TLS Certificates.”
- Select SSL Certificate
Click on the SSL certificate name associated with the CSR code and private key you generated.
- Upload Certificate Files
On the subsequent page, you’re required to upload your certificate files. You have two options:
- Upload the files directly.
- Copy the contents of the files into the appropriate fields and upload them in text format.
Ensure you possess all essential files, including:
- The SSL certificate (.crt)
- The optional CA certificate (.ca-bundle) for compatibility with older browser versions
- If you didn’t create the CSR in Plesk, you’d also need the private key (.key) file.
Once all files are ready, click “Upload Certificate.” A success message will confirm the installation.
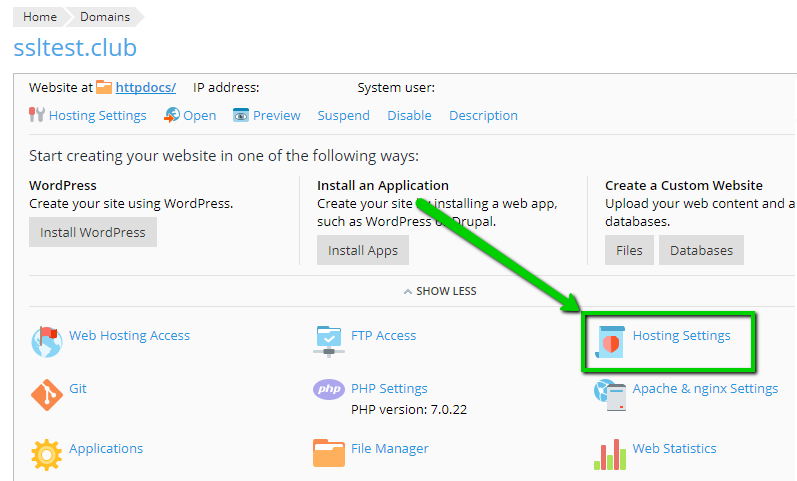
- Configure Hosting Settings
From your domain’s central dashboard, select “Hosting Settings.”
- Choose SSL Certificate
Pick your recently uploaded SSL certificate in the “Certificate” drop-down list. Confirm your selection by clicking “OK.”
- Finalize SSL Configuration
Look for another confirmation message indicating successful SSL configuration.
- Force HTTPS Connection (Optional)
You may also follow these additional steps to ensure a secure connection,
- Return to the previous step.
- Check the “Permanent SEO-safe 301 Redirect” box.
- Apply the changes and click “OK.”
Following these steps, you’ll seamlessly install an SSL Certificate on Plesk Onyx.
Where to Obtain Best SSL Certificates for Plesk Onyx
Elevate your website’s security with CheapSSLWeb, your ultimate destination for authentic SSL Certificates. Our commitment to excellence is evident through robust collaborations with premier Certificate Authorities, translating into unbeatable prices across our comprehensive SSL product spectrum. Seamlessly compatible with Plesk, our certificates cater to diverse needs, be it shielding a personal blog or fortifying your corporate email exchanges and experiencing the pinnacle of SSL protection.