How to Generate a CSR on Apache?

Before generating certificate signing request, make sure your have purchased trusted SSL/TLS Certificate.
Please find below a step by step procedure on how to generate a CSR on Apache using OpenSSL.
Please check the SSL Installation Instructions on Apache first provided if you have already created the CSR and got your trusted SSL certificate. If not, please continue with the following steps:
CSR Generation for Apache Web Server
Step 1: Log In
First, you have to connect to its terminal via the Secure Shell or SSH. This can be done from a terminal window on a Linux or Mac system, or using an SSH client such as PuTTY on the latest Windows systems.
ssh username@your_server_ipReplace username with your actual server username and your_server_ip with the IP address of your server.
Step 2: Run CSR Generation Command
Generate a private key and CSR by running the following command:
openssl req -new -newkey rsa:2048 -nodes -keyout server.key -out server.csr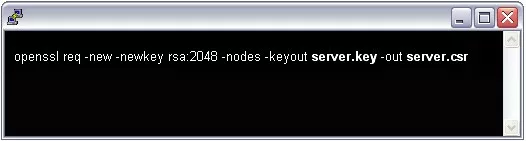
Here is what each part of the command means:
- openssl req -new starts the process to create a new CSR.
- -newkey rsa:2048 generates a new 2048-bit RSA key pair.
- -nodes means no DES encryption, i.e., the private key will not be password protected.
- -keyout server.key specifies the file name to save the private key.
- -out server.csr specifies the file name to save the CSR.
Note: Replace “server” with the domain name you intend to secure (e.g., mydomain.key and mydomain.csr).
Step 3: Enter Your Information
You will be prompted to enter the following details for the CSR:
- Common Name (CN): A domain name for which you want the certificate together with subdomains.
- Organization (O): Organisation name as registered at Companies House or similar body together with any suffix (such as Inc, LLC, Ltd).
- Organization Unit (OU): The name of the specific division within the organization that is requesting the particular certificate, for instance, Information Technology or the Web Security Department.
- City or Locality (L): This is the city or locality where your organization is legally incorporated, for instance, the state wherein you are incorporated as an association. While referencing them, do not use contractions or abbreviations, such as SF.
- State or Province (ST): The country state or province in which your organization is legally registered and from where it operates. Exceptions- do not abbreviate any state name (for example, do not write California as CA or California).
- Country (C): The legal entity country code in ISO two-letter Format containing letters only common in the English language (for example – US, GB, IN).
You may also be asked for a few optional fields like Email Address, A challenge password, and An optional company name. These can be left blank.
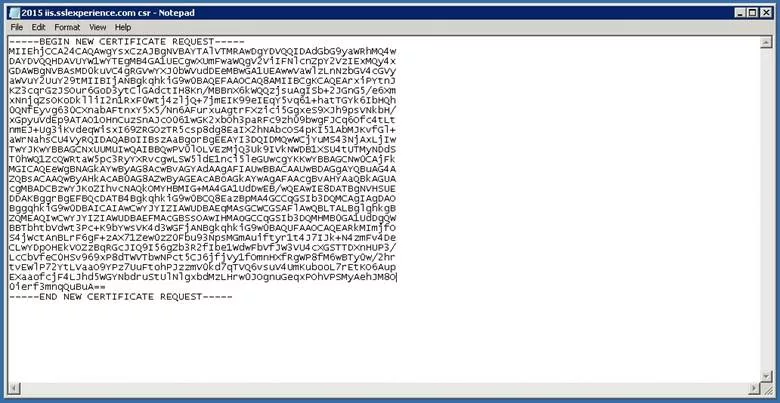
Step 4: Copy the CSR Text from the File
When the CSR generation process is done, look for the generated CSR file which should be in the server. csr file in the current folder.
Right-click the file and choose the option ‘Open with’ – edit to view the file’s content in a text editor.
For example, you can type the command cat, nano or vi to read the content of the file at the terminal:
cat server.csr

Or, to edit/view:

nano server.csr
Copy all the text in the CSR file, including the lines:
—–BEGIN CERTIFICATE REQUEST—–
… (your CSR content here) …
—–END CERTIFICATE REQUEST—–
Step 5: Generate the Order
Go to the Generation Form on your SSL provider’s website. Paste the entire CSR (including the —–BEGIN CERTIFICATE REQUEST—– and —–END CERTIFICATE REQUEST—– lines) into the blank text box provided on the form.
Follow the steps on the website and complete the rest of the process in generating CSR. This is typically done by choosing the kind of certificate that one wishes to acquire as well as more details as mandated by the SSL provider.
Step 6: Complete the Validation Process
Following the submission of the CSR, the order you made proceeds to validation by the corresponding Certificate Authority (CA). Depending on the type of certificate you have purchased (Domain Validation, Organization Validation, or Extended Validation), you may need to complete different forms of validation:
- Domain Validation (DV): Typically it involves the challenge of confirming control over the domain through a process which may involve confirming an email sent to a specific domain-registered email address or adding a specific DNS record.
- Organization Validation (OV): Needs confirmation about your organization’s identity in addition to the regular identity confirmation processes. It might be necessary to submit copies of documents and make a call verification.
- Extended Validation (EV): It involves a series of tests: legal tests i.e. formation, physical tests i.e. existence, and operational test i.e. control.
After validation of the domain has been made, the CA will grant your SSL certificate and you can use the installation process encoded in the installation instructions.
Conclusion
Secure your website with a Cheap SSL certificate from CheapSSLWeb and ensure your customers’ data is protected. Our SSL certificates are issued by leading Certificate Authorities like Comodo, Sectigo, DigiCert, Certera, Thawte, RapidSSL, and GeoTrust.
