How to Install an SSL Certificate on a Mac OS X 10.7 Server?

Establishing SSL/TLS encryption on your website is essential for securing user data and fostering trust. If you are using Mac OS X Server version 10.7 or later, installing an SSL certificate is fairly easy, but it must be done in order to be fully trusted by browsers and secure your server.
The intent of this article is to outline some basic steps for processing (including installing intermediate certificate(s) and binding your SSL cert to your site to name a few).
Prerequisites
Mac OS X Server Version 10.7 or Higher
- The installation process is geared only for the Mac OS X Server version 10.7 (Lion) and later.
- If you are still using an earlier version of OS X Server, you may not have the necessary tools or interface items to accomplish the certificate installation.
Administrator Access
- You as a user must have Administrator level rights on the Mac server.
- The process of installing SSL Certificates involves accessing and modifying the system keychain, unlocking secured areas of the server and binding certificates to sites.
- Without administrator rights, the operating system will prevent the necessary actions required to process the SSL Certificates.
Valid Certificate Files from Your CA
- You will need to download your certificate files from your Certificate Authority (CA) before proceeding with installation.
- They are usually provided in a zipped or compressed ZIP format containing the server certificate (e.g. servercertificate.crt) and one or more intermediate certificates (e.g. intermediate1.crt).
- Taken together, these files establish a complete chain of trust from your server to end user browsers.
Completed Certificate Signing Request
- The installation of an SSL certificate requires that you have created and submitted a certificate signing request (CSR) with your CA.
- This CSR must be based on your domain and be associated with the private key on the server.
- If you skipped the CSR step, you will need to create one using the Server App before you can install the SSL certificate.
Unzip Utility to Extract Certificate Files
- Since the CA provided the certificate(s) in a ZIP file you will need some sort of unzip tool to extract the files. macOS has a built-in archive utility that handles ZIP files.
- You can also use a third-party application like WinZip or 7Zip if that is your preference or if you are transferring from another system.
Keychain Access and OS X Server App Installed
- It is important to have two installed applications: the Keychain Access application and the OS X Server Application.
- The Keychain Access application is used to manage and install the intermediate certificate into the system keychain, and the OS X Server Application is used to install the server certificate and bind it to your website.
- Both of these applications come built into Mac OS X Server. Active Website Configured in OS X Server.
- The last requirement is that you already have a website configured in the OS X Server Application.
- You need to have the SSL certificate bound to a website in order to use HTTPS.
- If you do not have a website configured, you will need to create one in the Websites section before you can bind the certificate.
Steps to Install an SSL Certificate on a Mac OS X 10.7 Server
Step 1: Prepare Your Files
- Download your SSL certificate ZIP file from your CA.
- Extract it to get: servercertificate.crt (your server cert) and intermediate1.crt (CA’s intermediate certificate)
Step 2: Install the Intermediate Certificate
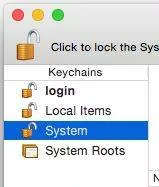
- Open Keychain Access via Spotlight.
- Unlock the System keychain (right-click > Unlock).

- Enter your admin password.
- If the System keychain has been unlocked successfully, you should be able to see the padlock image has changed to an opened padlock.
- Open the folder where you saved the SSL/TLS certificate files and drag the intermediate1.crt file into the System keychain.
- The Intermediate certificate is now installed to your server.
Step 3: Install the Server Certificate
- Launch the OS X Server App via Launchpad.
- Click Certificates on the left menu.
- Find the pending request (created during CSR generation).
- Double-click the request and drag servercertificate.crt into the Certificate Files box.
Step 4: Bind the Certificate to Your Website
- In the Server App, select Websites.
- Double-click on “Server Website (SSL)”.
- Use the dropdown next to SSL Certificate to select your installed cert.
- Click OK to save.
- Restart the server by toggling the switch OFF and ON at the top right.
Secure Your Mac Server with Affordable SSL
Whether you have a personal project, website, or a business-critical Mac OS X Server, CheapSSLWeb has the best selection of SSL Certificates from all of the prominent Certificate Authorities. All at a huge discount.
