The Certificate Signing Request (CSR) is an Important Element of Securing Your Check Point VPN Appliance with an SSL Certificate. Your CSR Will Contain Information About Your Organization’s Domain That Has Been Encrypted and Sent to a Certificate Authority (CA) So They Can Issue Your SSL Certificate.
This article provides Instructions On How To Create A CSR For Your Check Point VPN Appliance using SmartDashboard or SmartConsole, How To Import CA Certificates, And How To Prepare To Install SSL Certificates In Your Environment
Prerequisites
Before generating your CSR, make sure you have:
- You Will Need To Have Administrative Rights To Access Check Point SmartDashboard or SmartConsole
- You Must Have Access To Your Check Point VPN Gateway Device’s Properties
- You Must Have A Root And Intermediate CA Certificates
- You Must Have A Fully Qualified Domain Name (FQDN) for the VPN Portal
Steps for CSR Creation for Checkpoint VPN Appliance
Step 1: Add the Root Certificate
- Open the SmartDashboard to see all your network devices.
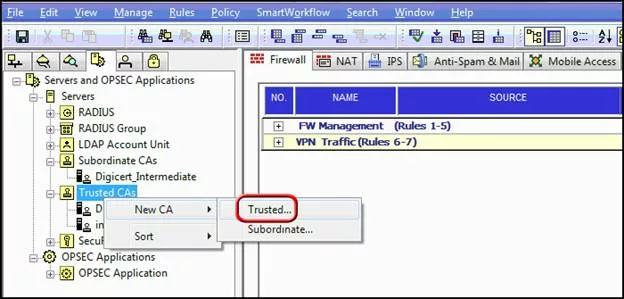
- Right-click on Trusted CAs and then click New CA > Trusted.
- In the Certificate Authority Properties window, on the General tab, enter a name for the root certificate in the Name box (e.g., DigiCert_Root).
- On the OPSEC PKI tab, check HTTP Server(s).
- Next, click Get and browse to and open the TrustedRoot.crt file that DigiCert sent to you, and click OK.
- In the Certificate Authority Certificate View window, click Ok to trust this Certificate Authority root certificate.
Step 2: Add the Intermediate Certificate
- In the SmartDashboard, right-click on Trusted CAs and then click New CA > Subordinate.
- In the Certificate Authority Properties window, on the General tab, enter a name for the Intermediate certificate in the Name box (e.g., DigiCert_Intermediate).
- On the OPSEC PKI tab, click Get and browse to and open the DigiCertCA.crt file that CA sent to you & click OK.
- In the Certificate Authority Certificate View window, in the lower right-hand corner, click Ok. You are now trusted by this Certificate Authority Intermediate Certificate.
Step 3: Create Your CSR
- Navigate to the Device properties of the device that will generate/send the SSL and click Add to create a CSR.
- For example, go to Gateway Cluster > IPSec VPN > Add > Certificate Nickname (e.g., FQDN).
- In the Certificate Properties window, enter the following information:
| Field | Description |
| Certificate Nickname | Enter a nickname for the certificate (e.g., DigiCert or yourdomain.com). |
| CA to enroll from | In the drop-down list, select the intermediate certificate that you added (e.g., DigiCert_Intermediate). |
- When you are finished, click Generate.
- In the Check Point SmartDashboard window, click Yes to generate the certificate for this node.
- In the Generate Certificate Request window, in the DN box, enter CN=vpn.yourdomain.com and click OK.
Note: If you are getting a SAN certificate, click Define Alternate Names and when prompted, specify those names.
- Next, click View to see the CSR.
- In the Certificate Request View window, do the following and then click OK:
| Option | Description |
| Click Copy to Clipboard | Copy the contents of the certificate to the clipboard. You must paste the CSR into a text editor like Notepad if you use this option. If you later copy something else, you can still recover your previously copied CSR without having to recreate it. |
| Click Save to File | You can save the CSR to your Check Point VPN Appliance. This is the recommended method for creating a backup of your CSR. |
- Use a text editor, open the document, then you can copy the text; consisting of the —–BEGIN CERTIFICATE REQUEST—– and —–END CERTIFICATE REQUEST—– tag line. You will then need to paste this information onto your DigiCert order form.
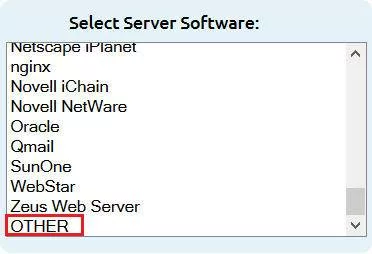
Note: You will need to select “Other” from the list of Server Software Options during your DigiCert SSL Certificate order process so that you will receive all of the required certificates for Checkpoint SSL Certificate Installation to go with those requested according to the order.
- After you receive your SSL Certificate from CA, you can install it.
Next Step: How to Install an SSL Certificate on Checkpoint VPN?
Conclusion
A CSR is needed on your Check Point VPN appliance to create SSL-secured certificates to allow you to communicate through a trusted SSL connection when using a VPN. To do this, you must first correctly install your root and intermediate certificates and then generate your CSR via SmartDashboard or SmartConsole.
After that, your environment will be configured for safe deployment of SSL and encrypted remote access via a securely installed SSL certificate.
You can acquire SSL certificates for the lowest possible cost through our company; if you have any questions about generating your CSR, installing your SSL certificate, configuring it to work with your existing software/hardware, or troubleshooting the installation process, don’t hesitate to contact our support team.