How to Encrypt Emails in Microsoft Outlook and Office 365?
Email encryption plays an integral role in meeting privacy and security needs in the current digital world. Businesses should take steps to safeguard their client’s and should be confidentially aware of their personal data.
Microsoft Outlook and Office 365 have their encryption options, for instance, Microsoft Outlook and Office 365 Message Encryption (OME), certificate-based encryption, and different third-party add-ins.
Recommended: Email Security Best Practices to Safeguard Email and Email Server
This type of encryption easily wins people’s hearts since there is no need to purchase certificates, and it is usable by all kinds of email clients. To send a ciphertext email with OME, all that is needed is to create a new message and click the “Encrypt” button.
Another method is that those who want to send an email via Outlook or Office 365 merely enter the word “Encrypt” in the subject line.
Emails encrypted using a one-time password or Office 365 login can be accessed either by using a Microsoft account or work/school accounts connected to Office 365.
Recommended: Email Certificate Not Secure: How to Solve the ‘Not Verified’ Error in Outlook
Outlook Email Encryption Option
The two primary encryption options available in Outlook are S/MIME encryption and Microsoft 365 Message Encryption.
Steps to encrypt emails in Outlook and Office 365 for you:
For Outlook:
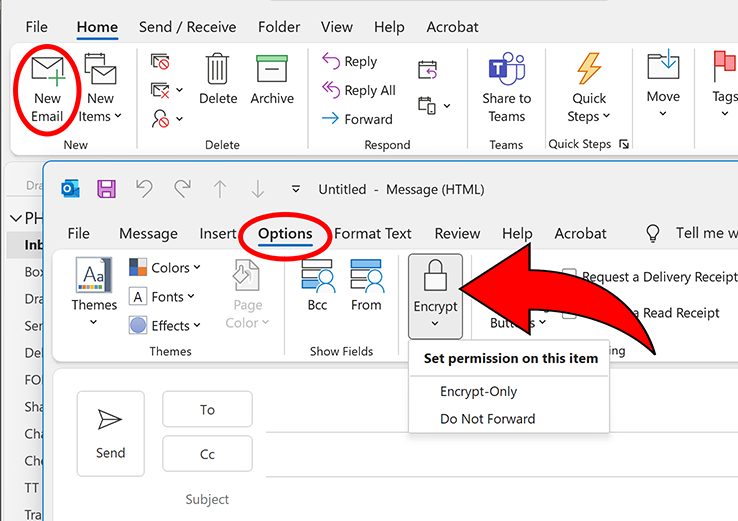
- First of all, write a new email and specify under the ‘To‘ field the recipient’s email address.
- In the “Options” panel, click the ‘Permissions‘ button and select ‘Encrypt-Only‘ or ‘Do Not Forward‘. (Please choose which one you want.)
- Have the email sent to the recipient. Learn Vocabulary from the Text: Encourage deeper comprehension of complex topics by integrating pictures and diagrams.
- Their encrypted email client should support the message, and the digital certificate needs to be installed. Consequently, the recipient should be able to see the email in an encrypted format.
- The symbol “Encrypted” or the lock image would be displayed in the email header or subject line to give certainty that the email is in secure mode.
- The email that you were waiting for is finally in your inbox. If you open it and look for the “This message was encrypted” note at the top of the message body, you might find something like that.
Recommended: How to Send an Encrypted Email from Outlook?
For Office 365:
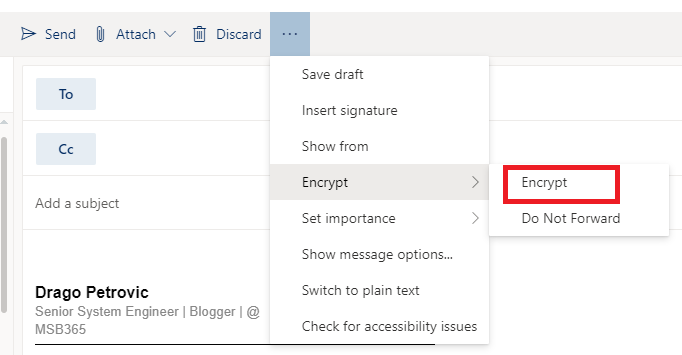
- Type *Encrypt* or *Encrypted* subject lines of the email, then send it.
- You can click send when all is filled up in your email.
- The sender will receive an email that reads that an email containing a cryptogram has been sent to them.
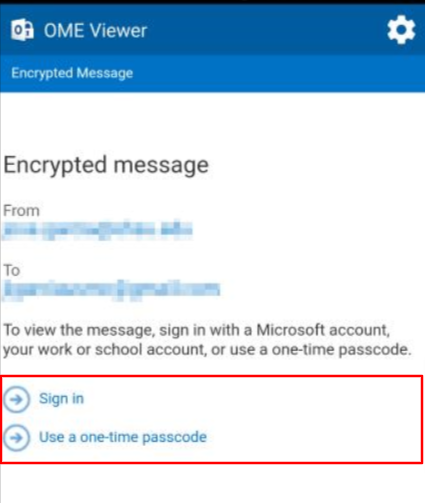
- The recipient will have two options for viewing the email: Sign in or receive a one-time passcode.
- The sign-in option will not just take you to the mailbox, but will also locate the email.
- If you pick the passcode option, you will receive a second email with a passcode to enter if you want to view your encrypted emails.
How to Encrypt Emails with S/MIME?
Follow these steps to Encrypt Emails with S/MIME:
Install S/MIME Certificate:
Each of the two involved parties requires an S/MIME certificate to be installed on their email program. In the traditional system, these certificates include a public and private key set that is mathematically tied but distinct.
Compose Email:
At the time of sending emails, the sender encrypts the message utilizing the receiver’s public key. This ensures that only those who have the corresponding private key can decrypt and read them.
Digital Signature:
Besides encrypting the content of the email, S/MIME signs the email with a digital signature, thereby confirming the sender’s identity as well as the email’s overall integrity. The sender utilizes his private key within the digital envelope, and the recipient of the email ensures the integrity of the signature using the sender’s public key.
Email Encryption:
Cryptography utilizing the recipient’s public key is used to encrypt the content of my email, so that the privacy of emails is retained even if they are intercepted. No one else except the recipient can decode this message with the use of their private key.
Data Confidentiality:
S/MIME encryption takes the confidentiality of data, as well as possible attachment,s to the next level as it can deliver the coded message to the recipient, meaning that the private key is necessary in order to decode it back.
Digital Signature Authentication:
Digital signatures allow for ascertaining the sender’s identity, and the recipients can verify the integrity of the content through the sender’s public key.
Non-repudiation:
In light of that, each sender’s digital signature is personal, and it is related to the identity of the user and the domain on which it is located, which provides non-repudiation in the process of legal proceedings.
Content Integrity:
For the sender’s recipients can conduct a clustering, therefore, the absence of alterations in the email content can be validated, and the message remains unaffected.
Also Read: How to Set Up BIMI and Add a Verified Logo to Your Business Emails?
How to Encrypt Emails with Office 365 Message Encryption?
To encrypt emails with Office 365 Message Encryption (OME), follow these steps:
Verify Eligibility:
Ensure that your subscription is inclusive of Office 365 and this can be done by either opting for the Office 365 Enterprise E3, E5, Microsoft Enterprise Subscription E3, E5, Microsoft 365 Business Premium, Office 365 A1, A3, A5, and finally Office 365 A1, A3, A5, and lastly Office 365. Otherwise, you can pick the information protection plan 1 as a single-user license.
Connect to Exchange Online and AADRM:
Pull up PowerShell, and connect to the Microsoft Exchange Online service and the Azure Active Directory Rights Management (AADRM) service using the Connect-AadrmService and Connect-ExchangeOnline command respectively.
Enable Azure Information Protection (AIP):
Type in the Enable-Aadrm command to set up AIP.
Verify IRM Configuration:
Run Get-IRMConfiguration and Get-RMSTemplate FL commands to give IRM (Information Rights Management) configuration, once over.
Test OME:
Use the Test-IRMConfiguration command and check if OME (Opt-in Authentication) is enabled.
Create Mail Flow Rules:
OME will be enabled by default for all emails. Nevertheless, you can create transport rules (message flow rules) that can be set up to encrypt only incoming emails meeting conditions, like keywords or recipients.
Encrypt Emails:
You can enable the encryption by either going to OWA or Outlook and clicking “Encrypt” and choosing a Rights Management Services (RMS) template to apply the encryption.
Verify Encryption:
You can check if the OME has been configured and is working perfectly by querying the Test-IRMConfiguration PowerShell command.
Also Read: WHAT IS S/MIME OR ENCRYPTED EMAIL? How It Works?
How to Create Mail Flow Rules for Encrypted Email Messages?
To create mail flow rules for encrypting email messages in Microsoft 365, follow these steps:
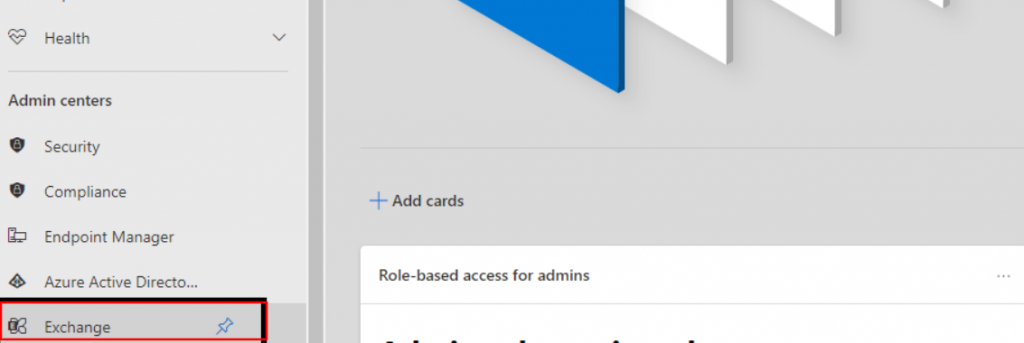
Step 1: Sign in to the Microsoft 365 admin center: Log in to the Microsoft 365 admin center using the administrator’s credentials.
Step 2: Access Exchange Admin Center (EAC): Switch to the Exchange admin center by heading to Exchange under Admin centers, which is in the left navigation panel.
Step 3: Create a New Rule: In EAC, click Mail flow > Rules; in the dropdown list, press New, and a rule is created.
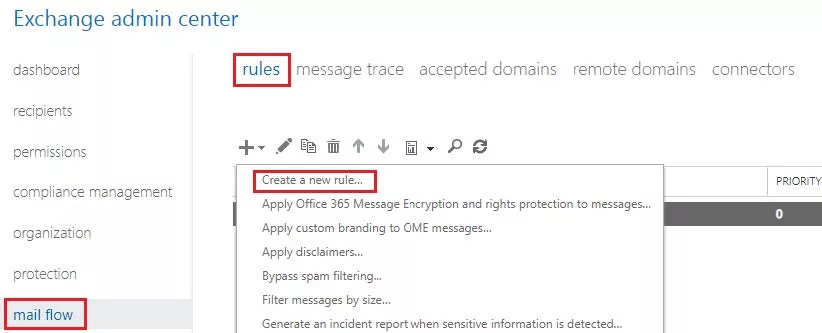
Step 4: Configure Rule Settings:
- Name: Create a name for this law piece.
- Apply this rule if: Select when this rule should be in force, and enter the value, if it is needed.
- Do the following: Select the right course of action if the above-mentioned rule applies.
- Properties of this rule: Evaluate to what extent this policy has to be observed.
- Choose a mode for this rule: Decide whether to resolve the incident or experiment with it.
Step 5: Enable Encryption with OME capabilities:
- The next step would be to press More options to add more conditions.
- Unmask threats to the message security, only by doing this, by making infringements on the security of information.
- Apply the Office 365 Message Encryption and rights protection to encrypt and secure your emails.
- Click on the RMS template you want and subsequently click on Save.
How to Encrypt Emails in Outlook On the Web?
To encrypt emails in Outlook on the web, follow these detailed steps:
- Log in to Outlook on the web: Launch your browsing application and proceed to the “login to Outlook on the web” web page. Enter your email address and password to log in.
- Compose a new email: Click on the “New message” button and begin formulating a new email.
- Encrypt the email: Search for an “Encrypt” icon if it is present in the top toolbar. It can be done as follows: Click on it so that it becomes secure.
- Send the email: After encryption of the email, you are able to deliver it to the recipient who actually addresses the message to. The email will include a link with a message to read and will enable a secure link for communication.
How to Read Encrypted Emails?
To read encrypted emails, the process varies based on the encryption method used:
Step 1: S/MIME Encryption
Securing the MIME protocol for both users is an important step to enable SMIME.
Open Outlook, and search among the encrypted emails; if it’s configured, it will be automatically decrypted. If required, give your passphrase connected with your S/MIME certificate.
Step 2: Microsoft 365 Message Encryption
Open a message’s email in Outlook to choose to read it to get the ciphered information.
Step 3: FlowCrypt
Go to mail.google.com and open the encrypted email, and it will automatically decrypt after viewing. Listen to and identify the information discussed in the audio clip.
Step 4: Protonmail Password-protected Emails:
As follows the instruction, the link “Unlock message” should be clicked in the email.
Enter the password that you and the author decided on and press “Decrypt and view message” to see the email.
Conclusion
Take your website security to an elevated level by employing CheapSSLWEB’s Email encryption solutions in building trust among your visitors.
