How to Generate Private Key and CSR using cPanel?

What is CSR?
CSR or Certificate Signing Request is a block of encoded text sent by an organization or an individual to a CA (Certificate Authority) while applying for a digital certificate.
The CSR includes basic information on the Applicant, namely the domain name, the name of the organization, locality, and country.
It also has a public key which is incorporated into the certificate when it is issued. The private key which corresponds to this key is known only to the applicant and it is applied to decrypt the information encrypted by the public key, thus providing security to the applicant.
What is a Private Key?
A private key is an essential part of what is known as public key cryptography which is used in the protection of messages transported over the internet.
It is a private key, only known to the owner, by which the messages encrypted with the aid of the corresponding public key are decrypted. On sending the message the message is encrypted using the recipient’s public key and this key is not a secret one.
Also Read: Public Key and Private Key Pairs: What are they and How do they Work?
However, the message can only be decrypted with the recipient’s private key so only the recipient is able to read the content of the message.
Besides the privacy of the content of the communication, this mechanism also confirms the authenticity of the sender and the contents of the message.
How to Generate Private Key in cPanel?
To generate a private key in cPanel, follow these detailed steps:
- To get to the cPanel, you will have to use your username and password.
- After successfully logged in to the account, locate the “SECURITY” tab at the left side of the cPanel panel.
- In the main screen of the StrongVPN client, select the “SSL/TLS” option. This will open SSL/TLS Manager with features for managing SSL certificates, private keys, and Certificate Signing Requests (CSRs).

- In the SSL/TLS Manager, there should be a field called “Private Key (KEY)”.
- To do this, click a link that says “Generate, view, upload, or delete your private keys”. This will take you to the Private Key Management page through which you can manage and generate your private keys.
- On the ‘Private Key Management’ page you will find options to create a private key.

- From the drop down menu, choose the Key Size under the 2048-bits option. This is a standard size that provides a nice level of protection without compromising the performance of the product.
- Under the “Description” field, input your domain name (for example, example. tld). This is useful when you have many keys generated based on a single password for different purposes or different domains.
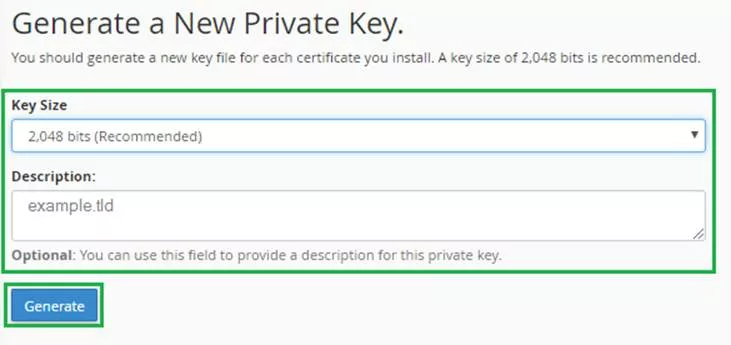
- Once the necessary information has been entered, click on ‘Generate’.
- Now, the control panel cPanel will create a new private key and save it on your server securely.
- After the generation of the private key, the green notice will appear on the screen:
- It is now stored on your server and ready for use when you need to generate CSRs or install SSL certificates.
How to Generate CSR in cPanel?
- Start with opening the cPanel interface by entering the login details you were provided.
- To access the Security tab, navigate to the cPanel interface’s features list and find the Security category. Upon it being located, click on the tab labeled as “SSL/TLS”.
- In the CSR section of the right hand panel, go to “Generate, view or delete SSL certificate signing requests”.
- On the next page, the user will have to enter the necessary information in the fields provided. You should also see that when giving details, you only use alphanumeric characters to avoid some problems.
- Key: To generate a new private key click the “Generate a New 2048-bit key” tab. If you have a private key derived from another independent process, select from the pull-down list.
- Domains: Enter the FQDN where the SSL will be implemented. For Wildcard certificates, one should place an asterisk before the domain name (i.e., *. example. com). If there are multiple domains, then each domain should be provided on different lines.
- City: Please input the complete name of city or locality without using the abbreviations.
- State: Please write the full name of the state or province without using the state or province abbreviation.
- Country: Choose the county of incorporation of the certificate’s company from the drop-down list.
- Company: Give the official name of your business that has been registered with the government authorities. Special characters in your company name For peculiar characters that are unique to your company name, verify with the CA to see if they are acceptable.
- Company Division: Input the name of the division or group you are entering within your company, and check the acceptability of special characters if there is any.
- Email: One, the account should include a valid email address for domain ownership verification.
- Passphrase: A few CAs may ask for a CSR passphrase to ensure extra security in operations. To some extent it is beneficial since it goes further than merely confirming the identity of the requesting individual. Remember, CSR passphrases are in an unencrypted format and can be made available to third parties, so do not use critical passwords.
A passphrase guards the private key files from being accessed by other unauthorized personnel through encapsulation.
However, though not mandatory, it adds an extra layer of security by requiring a passphrase to be entered before Apache Web Server can use the private key, and this means that you would have to input the passphrase each time Apache is restarted or rebooted.
In this encryption model, the private key requires a passphrase, but the system integrity and superuser access make this key more secure.
- After completing the relevant details, click the “Generate” button.
- Congratulations for generating your CSR successfully.
- When submitting the CSR code for SSL activation, make sure that the CSR code contains clear headings such as “—–BEGIN CERTIFICATE REQUEST—–” and “—–END CERTIFICATE REQUEST—–”.
Conclusion
Secure your website with best SSL Certificates. You can now use the Encoded Certificate Signing Request to install or to activate your bought certificate with CSR Generator or indeed with any other certificate service provider.
