How to Generate a CSR in IIS 7, 8, 10?
CSR stands for Certificate Signing Request and this is mainly generated when applying for an SSL certificate. Here is an outline of the instructions as to how one might produce a CSR with the help of IIS (Internet Information Services) Manager.
If you already have CSR then you can skip below steps and jump to Installation Steps on IIS 7, IIS 8, IIS 10.
Steps to Generate a Certificate Signing Request (CSR) in Windows IIS 10
These procedures were performed with Windows 10 with IIS 10, however, these methodologies will work for IIS 7, 8 as well as 10. Below are the guidelines on how to go about the formulation of your CSR:
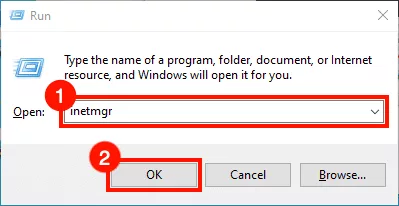
- Open the Run Command: Now you need to open the Run dialog box to do this you press Windows + R on your keyboards.
- Type inetmgr: Next, in the Run window please enter inetmgr and press the OK button. This will start IIS Manager.
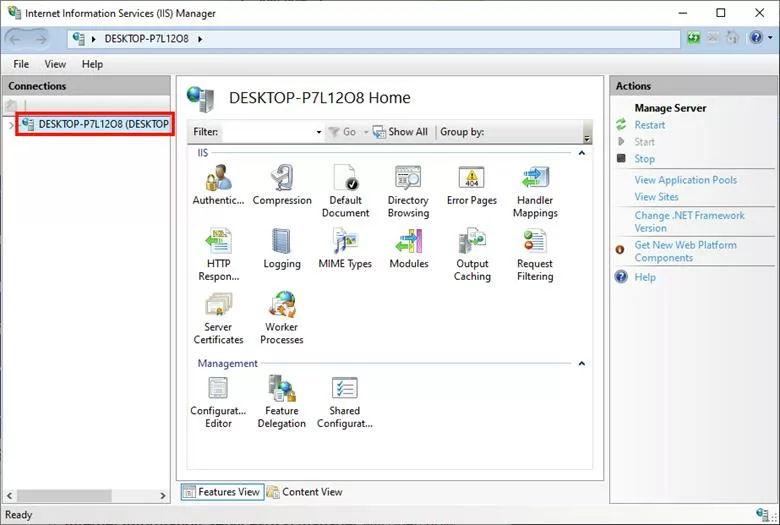
- Locate the Connections Pane: On the upper PAN of the IIS Manager window, there will be placed the Connections folder by default.
- Select the Server: Like in the previous steps, to choose the server right-click on its name.
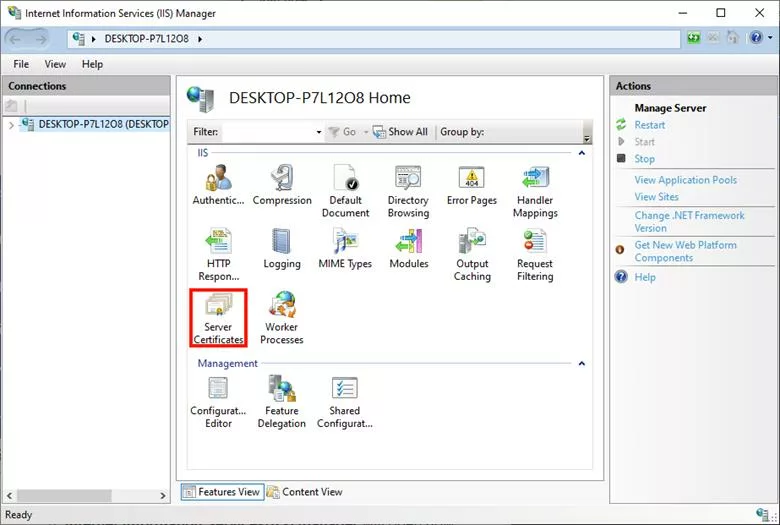
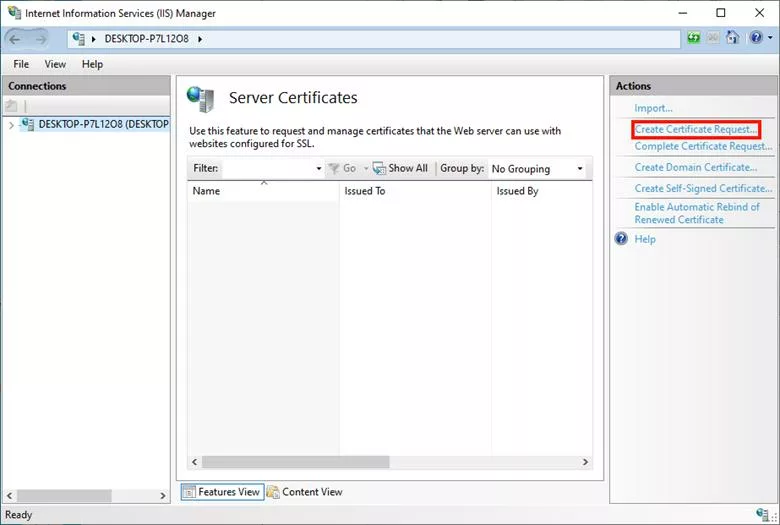
- Find the Server Certificates Icon: Next in the center pane you click on the IIS icon and then double click on the Server Certificates icon.
- Navigate to the Actions Panel: On the right side of the window the option called as Action pane will be available.
- Click Create Certificate Request: This will bring up the “Certificate Manager” page – click on the “Create Certificate Request” link.
- Request Certificate Wizard: This will open the Request Certificate wizard.
- Fill Out the Form: In the Distinguished Name Properties form, you have to input the following details:
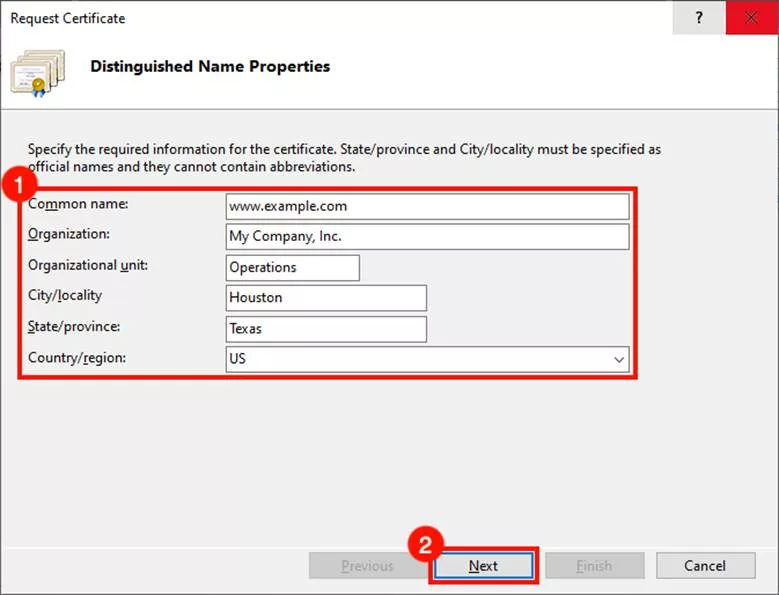
-> Organization: Your company or organization’s official, official legal name if it has one or part of your given name if it does not.
-> Common Name: The FQDN you’re getting the certificate for (in other words, the server name of the certificate, and not the domain name of the location, e. g. www. mydomain. com or *. mydomain. com in case of the wildcard certificate).
-> City/Locality: The legal place where the operation of your business firm is incorporated.
-> State/Province: Refers to the state or province in which the firm legally operates from, or is incorporated.
-> Country/Region: The short code paragraph consists of two alphabets symbolizing the country (For instance, US for United States).
-> Proceed: Having completed the form, press the Next button.
-> Select the Provider and Bit Length: This is where the drop-down menus are supposed to be – please select from the options that you see below.
-> Cryptographic Service Provider: Microsoft RSA SChannel Cryptographic Provider.
-> Bit Length: 2048.
-> Proceed: Make sure once these settings have been set, click on the Next button.
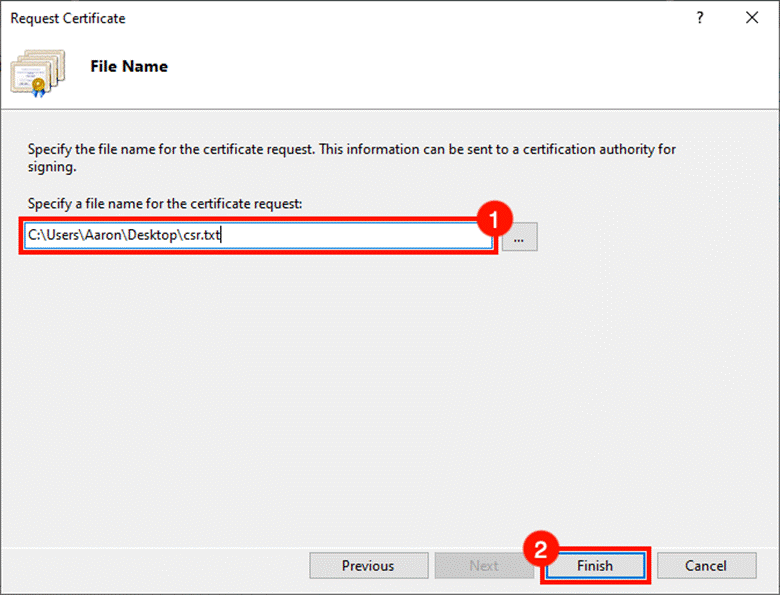
-> Name Your CSR File: The file you are importing for CSR should be given a name of CSR with a file extension. Select a name that will be easy to remember and appropriate to the frequency it will be used.
- Finish the Process: The last step is to click in the finish button to conclude the generation of the CSR document.
- Open Your CSR: Find the CSR file that you have newly created. Look at it in Write, a simple text editor like Notepad.
- Submit Your CSR: When you are ready, copy the entire content of the CSR, including the —–BEGIN CERTIFICATE REQUEST—– and —–END CERTIFICATE REQUEST—– lines, and submit it to your Certificate Authority (CA) for signing.

Conclusion
Secure your online identity with Low Cost SSL Certs from CheapSSLweb. You can protect your website for just a small amount of money with our reliable certificates. Come and see us today and be able to effectively protect your site at a very reasonable cost.
