How to Setup a Self-Signed Certificate in IIS?

Oftentimes, developers find themselves in need of coming up with or testing an encrypted connection. In situations like these, a self-signed or local certificate comes in handy. These certificates can be useful, whether simply wanting to eliminate the browser’s mixed content warnings or MVC binding asking to do SSL.
SSL certificates have numerous roles to play: issuing the public key and, when issued by a trusted Certificate Authority (CA), validating the server’s identity so the end-users know they aren’t sending their details (be it encrypted or not) to any unauthorized party.
At CheapSSLWEB – Get Cheapest SSL Cert Start @ $3.99/yr
When it comes to a self-signed certificate, it is signed by an individual or organization rather than by a trusted third party. It is usually used on an Intranet server where the client’s server has to only undergo the local intranet to get to the central server as there is hardly any scope for MitM attacks.
Also Read: Self-Signed SSL Certificate Vs Trusted CA Certificate
If you are developing or testing software, you can go for self signed certificates on an IIS development server as it does not involve spending additional money buying a trusted certificate.
An IIS created self signed certificate can also be used on personal blogs that have few visitors.
Before we discuss how to do it, let us discuss what self signed certificate is.
What is a Self Signed Certificate?
Typically, Certificate authorities are responsible for validating and issuing cheap SSL certificates. Based on the SSL certificates one needs, the charges vary.
However, a self signed certificate is free of cost. But why is it free? It is because self signed certificates are the SSL certificates that are signed by the same organization or individual rather than going through the vetting process of the CAs.
These certificates do not offer the security level like the CA-issued SSLs, as the encryption method varies. However, self signed SSL will be of great help when browsers search for SSL on all websites. The SSL you choose for your websites is largely based on price factors and application.
Now, let us get to the part where we discuss the steps to create self signed certificates.
What are the Steps to Create a Self-Signed Certificate in IIS?
If you want to set up an HTTPS site locally on your machine, you must create a self signed certificate and add SSL settings to your IIS site. Follow the steps below to create one.
Creating a Self-signed Certificate in IIS
Go to the IIS Manager and follow the steps below to create a self-signed certificate:
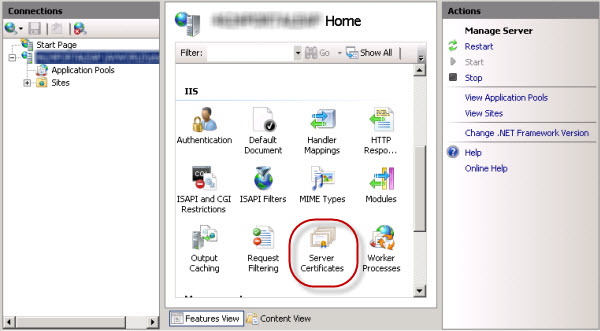
Step-1: Go to the Connections panel, click on your server in the tree view and then double-click on Server Certificates.
Step-2: Select the Create Self Signed Certificate in the Actions panel.
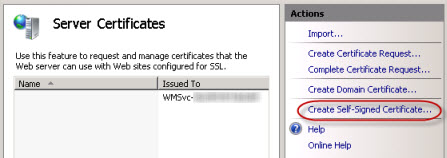
Step-3: For the new certificate, you have to put a user-friendly name and click on OK.
This is the first phase of the Self-Signed Certificate in IIS. The final step is binding it to SSL port 443. To know how to do it, follow the instructions mentioned below.
Binding the Certificate to the Website
After you create your SSL certificate, you must now bind it to the website hosting the Web Adaptor. Binding means configuring the SSL certificate for using port 443 on the site.
Usually, the instructions for binding the SSL certificate with a website keep varying based on the web server’s platform and version. We have provided a basic process for binding a certificate in IIS.
Binding a Certificate to Port 443 in IIS
In IIS Manager, follow the steps for binding a certificate to SSL port 443.
Step-1: Choose your site in the tree view, and in the Actions panel, click on Bindings.
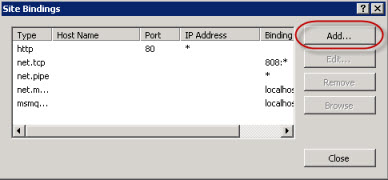
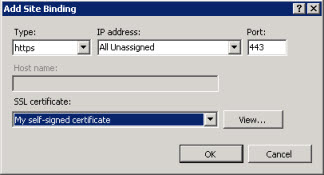
In the Bindings list, if you do not see an available port 443, click on Add. A Type drop-down list will appear from where you have to click on select HTTPS. Leave the port at 443.
However, if you see port 443 is available, click on the port from the list and click on Edit.
Step-2: Click on the Certificate name and click on OK from the SSL certificate drop-down list.
Testing the site
Now that you are done with binding the certificate with your website now is the time to configure the Web Adaptor for the application with the server. It is important to access the configuration of the Web Adaptor by using an HTTPS URL. It can be something like this:
https://webadaptor.domain.com/arcgis/webadaptor
After configuring your Web Adaptor, make an HTTPS request to ArcGIS Server Manager to check whether the SSL certificate is running properly or not. For example, https://webadaptor.domain.com/arcgis/manager.
These are the steps to create an IIS self-signed certificate. But note that these instructions assume that you have already installed IIS 10 on the Windows Server. Let us now see where we can use them.
What are the Applications of IIS Self-Signed Certificate?
If you own an e-Commerce website or a site that requires confidential data of your user, you must not use a self signed certificate instead the most reliable option for your cheap wildcard SSL certificate.
However, self signed certificates can be useful in certain situations. Let us discuss those scenarios.
- You can use self signed certificates on an intranet. It is usually used on an Intranet server where the client’s server has to only undergo the local intranet to get to the central server as there is hardly any scope for MitM attacks.
- You can use self signed certificates on an IIS development server. You can avoid incurring additional expenses by purchasing a trusted certificate when you are just in the testing or developing phase of your software.
- You can use self signed certificates on your personal websites with few visitors. Also, if your website asks for information that is of little value, there is hardly any scope for anyone to misuse it or launch an attack.
These are some of the scenarios when you can use an IIS self signed certificate.
Generate your Self Signed SSL on IIS!
The steps mentioned above are your guide to self sign your website. However, it is always important to remember that your visitor will still see a warning in their browsers while connecting to an IIS website that runs on a self signed certificate. This will keep happening until the certificate store permanently stores it.
We hope the guide will help you create self signed certificate for IIS manager.
